LangGraph4j - Implementing Human-in-the-Loop at ease
Key takeaways
This article will guide you through the process of evolving a classic ReAct agent to support a human approval workflow using the LangGraph4j library. We’ll see how the LangGraph4j architecture makes it straightforward to implement such control flows. In particular we focus on:
- How to evolve the classical Agent Executor implementation (refer to Diagram 1) to support a human approval flow.
- A detailed implementation example using LangGraph4j integrated with LangChain4j.
Introduction
In the world of AI agents, especially those performing actions with real-world consequences, ensuring control and oversight is crucial. The “Human-in-the-Loop” (HITL) pattern is a critical design choice that introduces a step for human approval before an agent executes an action with potentially impacting consequences. This not only enhances safety but also builds trust in the system that is exactly what we want our customers feels when we deliver in production AI powered workflows.
From the standard agent to agent with approval
The standard ReAct Agent
The standard ReAct (Reasoning and Acting) agent operates in a simple loop. The agent (or model) reasons about a problem, decides on an action (a tool to use), executes it, observes the result, and repeats the cycle until the task is complete.
This flow can be visualized as follows:
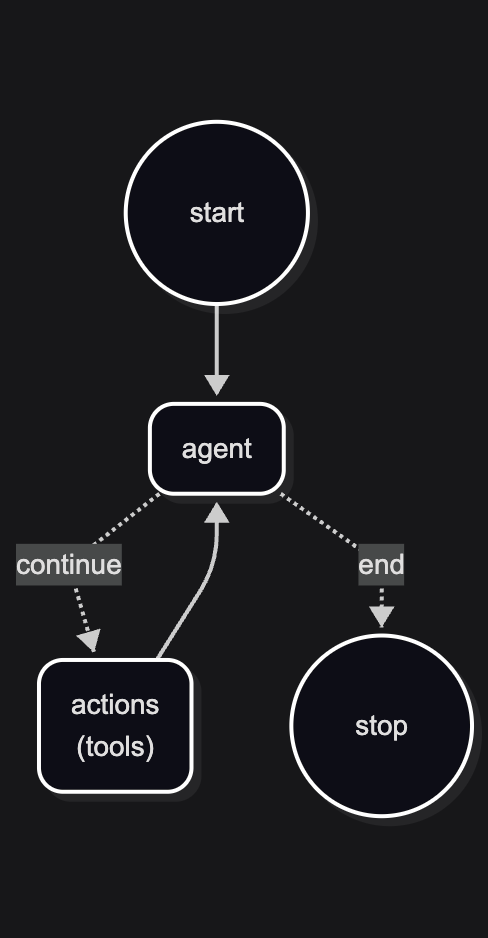
Diagram 1: A simple, cyclical agent that alternates between reasoning (agent) and execution (action).
While effective for many tasks, this simple loop lacks a clear entry point for external intervention. How can we pause the agent and ask for permission before it calls a specific tool?
Evolving the Agent: The Action Dispatcher
To introduce more control, we first need to make the agent’s action-taking process more modular. Instead of a single “action” step, we can introduce an “action dispatcher.” This node is responsible for routing the agent’s intent to the correct tool-specific node.
This architectural shift gives us a more granular and flexible graph.
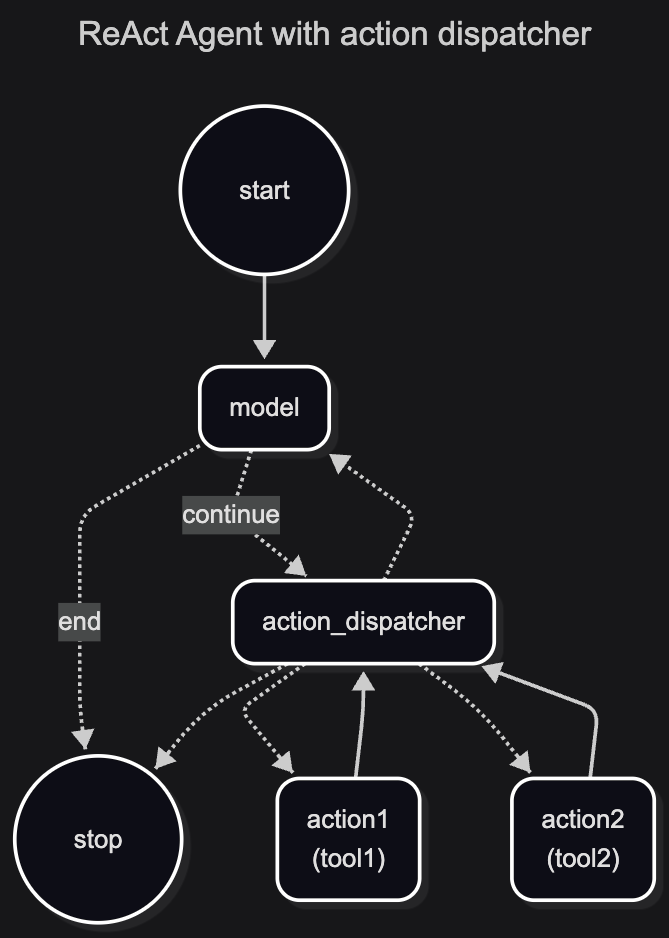
Diagram 2: The dispatcher model. The model decides which action to take, and the dispatcher routes the execution to the appropriate action node.
Now, each tool (action1, action2, etc.) is a distinct node in our graph. This separation is the key to enabling fine-grained control.
Introducing the Human Approval Workflow
With our modular dispatcher in place, we can now insert an approval node before any action that requires oversight. Let’s say we want to require human approval before executing action2.
We can introduce a new node, approval_action2, that intercepts the request from the dispatcher. This node’s job is to pause the execution and wait for external input.
The workflow is as follows:
- The model decides to run
action2. - The
action_dispatcherroutes the request to theapproval_action2node. - The
approval_action2node waits for a human to either APPROVE or REJECT the action. - If APPROVED, the graph transitions to the actual
execTest(action2) node to execute the tool. - If REJECTED, the graph transitions back to the model, informing it that the action was denied. The model can then use this information to reconsider its plan.
This creates a robust and safe execution flow.
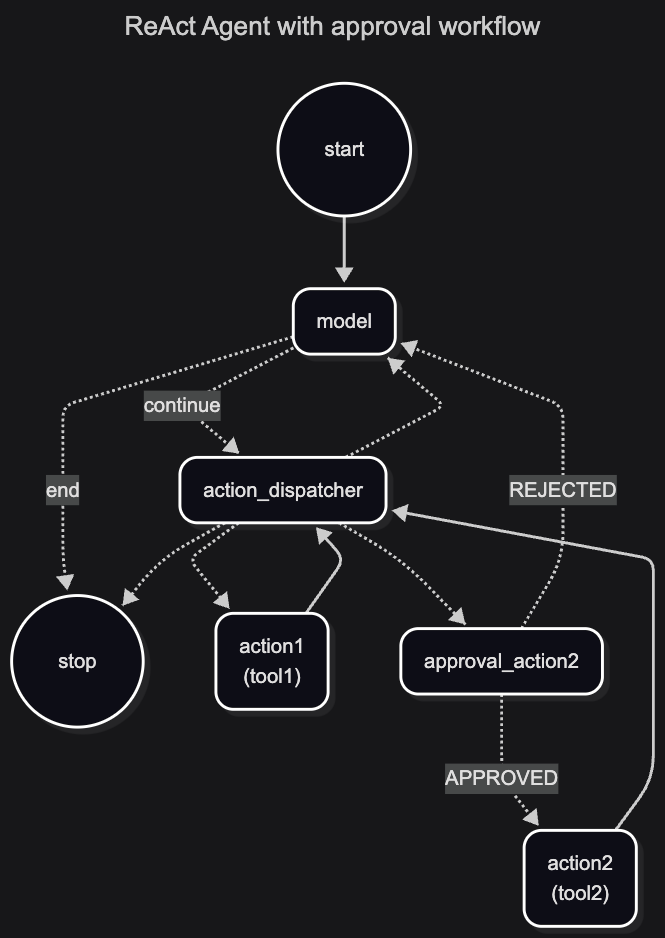
Diagram 3: The complete HITL workflow. The approval_action2 node acts as a gatekeeper for action2.
A Practical Example
LangGraph4j implementation notes
LangGraph4j provides a standard AgentExecutor (aka ReACT Agent) implementation and an extended one, AgentExecutorEx, which supports a human approval workflow. These implementations are available with both LangChain4j and Spring AI integrations.
In this article, we will focus on the integration with LangChain4j (see the implementation in langchain4j-agent module) but it is available also using Spring AI (see the implementation in spring-ai-agent module).
Let put all together
To see how this is implemented in code, you can look at the DemoConsoleController.java class within the langchain4j-agent test sources. This example demonstrates how to build and run an agent with a conditional human approval step, showcasing the power and flexibility of LangGraph4j.
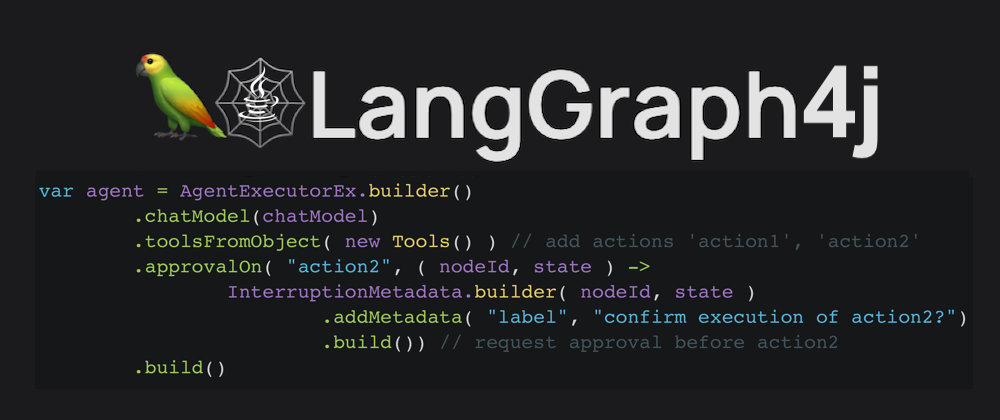
The key is to use AgentExecutorEx and its approvalOn method. This method allows you to specify a node where the graph execution should be interrupted. When the execution reaches this point, the graph pauses and returns an InterruptionMetadata object, which signals that human input is required.
Here is a code snippet from the example that illustrates how to set up and handle the approval mechanism:
// 1. Configure the agent to require approval on the "action2" tool
var agent = AgentExecutorEx.builder()
        .chatModel(chatModel)
        .toolsFromObject( new Tools() ) // add actions 'action1', 'action2'
        .approvalOn( "action2", ( nodeId, state ) ->
                InterruptionMetadata.builder( nodeId, state )
                        .addMetadata( "label", "confirm execution of action2?")
                        .build()) // request approval before action2
        .build()
        .compile(compileConfig);

// ... inside the execution loop ...

while( true ) {
    // 2. The stream() method returns a generator that yields state updates.
    //    When an interruption occurs, the generator will yield all states up to
    //    the interruption point and then return the InterruptionMetadata.
    var generator = agent.stream(input, runnableConfig );

    // We can process the yielded nodes (e.g., for logging)
    var lastNode = generator.stream().reduce((a, b) -> b).orElseThrow();

    // 3. Check if the graph has finished normally.
    if (lastNode.isEND()) {
        console.format( "result: %s\n", lastNode.state().finalResponse().orElseThrow());
        break;
    }

    // 4. If the graph has not finished, it means it was interrupted.
    //    We get the interruption metadata, which is the return value of the generator.
    var interruption = (InterruptionMetadata<?>) AsyncGenerator.resultValue(generator).orElseThrow();

    // 5. Prompt the user for approval using information from the metadata.
    var answer = console.readLine(format("%s : (N\y) \t\n", interruption.metadata("label").orElse("Approve action ?")));

    // 6. Resume the execution by updating the state with the user's decision.
    if (Objects.equals(answer, "Y") || Objects.equals(answer, "y")) {
        runnableConfig = agent.updateState(runnableConfig,
                Map.of(AgentEx.APPROVAL_RESULT_PROPERTY, AgentEx.ApprovalState.APPROVED.name()));
    } else {
        runnableConfig = agent.updateState(runnableConfig,
                Map.of(AgentEx.APPROVAL_RESULT_PROPERTY, AgentEx.ApprovalState.REJECTED.name()));
    }
    input = null; // Clear input for the next iteration, as we are resuming.
}
This code demonstrates the complete cycle:
- Configuration: The agent is configured to interrupt before the
execTestnode is executed. TheInterruptionMetadatais built with a custom prompt label. - Execution: The
agent.stream()method returns a generator. We consume the generator’s yielded values to process all intermediate states. - Check for End: We check the last yielded node to see if the graph has finished its execution.
- Handle Interruption: If the graph is not finished, we retrieve the
InterruptionMetadatafrom the generator’s return value. - User Interaction: We use the metadata to prompt the user for a decision.
- Resumption: The
agent.updateStatemethod is used to inject the user’s choice (APPROVEDorREJECTED) back into the graph’s state, allowing the execution to resume from where it left off.
This example highlights how LangGraph4j provides a clean and powerful mechanism for implementing Human-in-the-Loop workflows.
Conclusion
The Human-in-the-Loop pattern is essential for creating safe and reliable AI agents. As we’ve seen, LangGraph4j’s is suited for implementing such complex control flows. By evolving from a simple agent loop to a modular graph with dispatcher and approval nodes, you can build sophisticated, human-supervised agents with confidence.
Hope this could help your AI Java developing journey, in the meanwhile happy AI coding! 👋